Bakasana (Crow Pose): How to Do It Step by Step

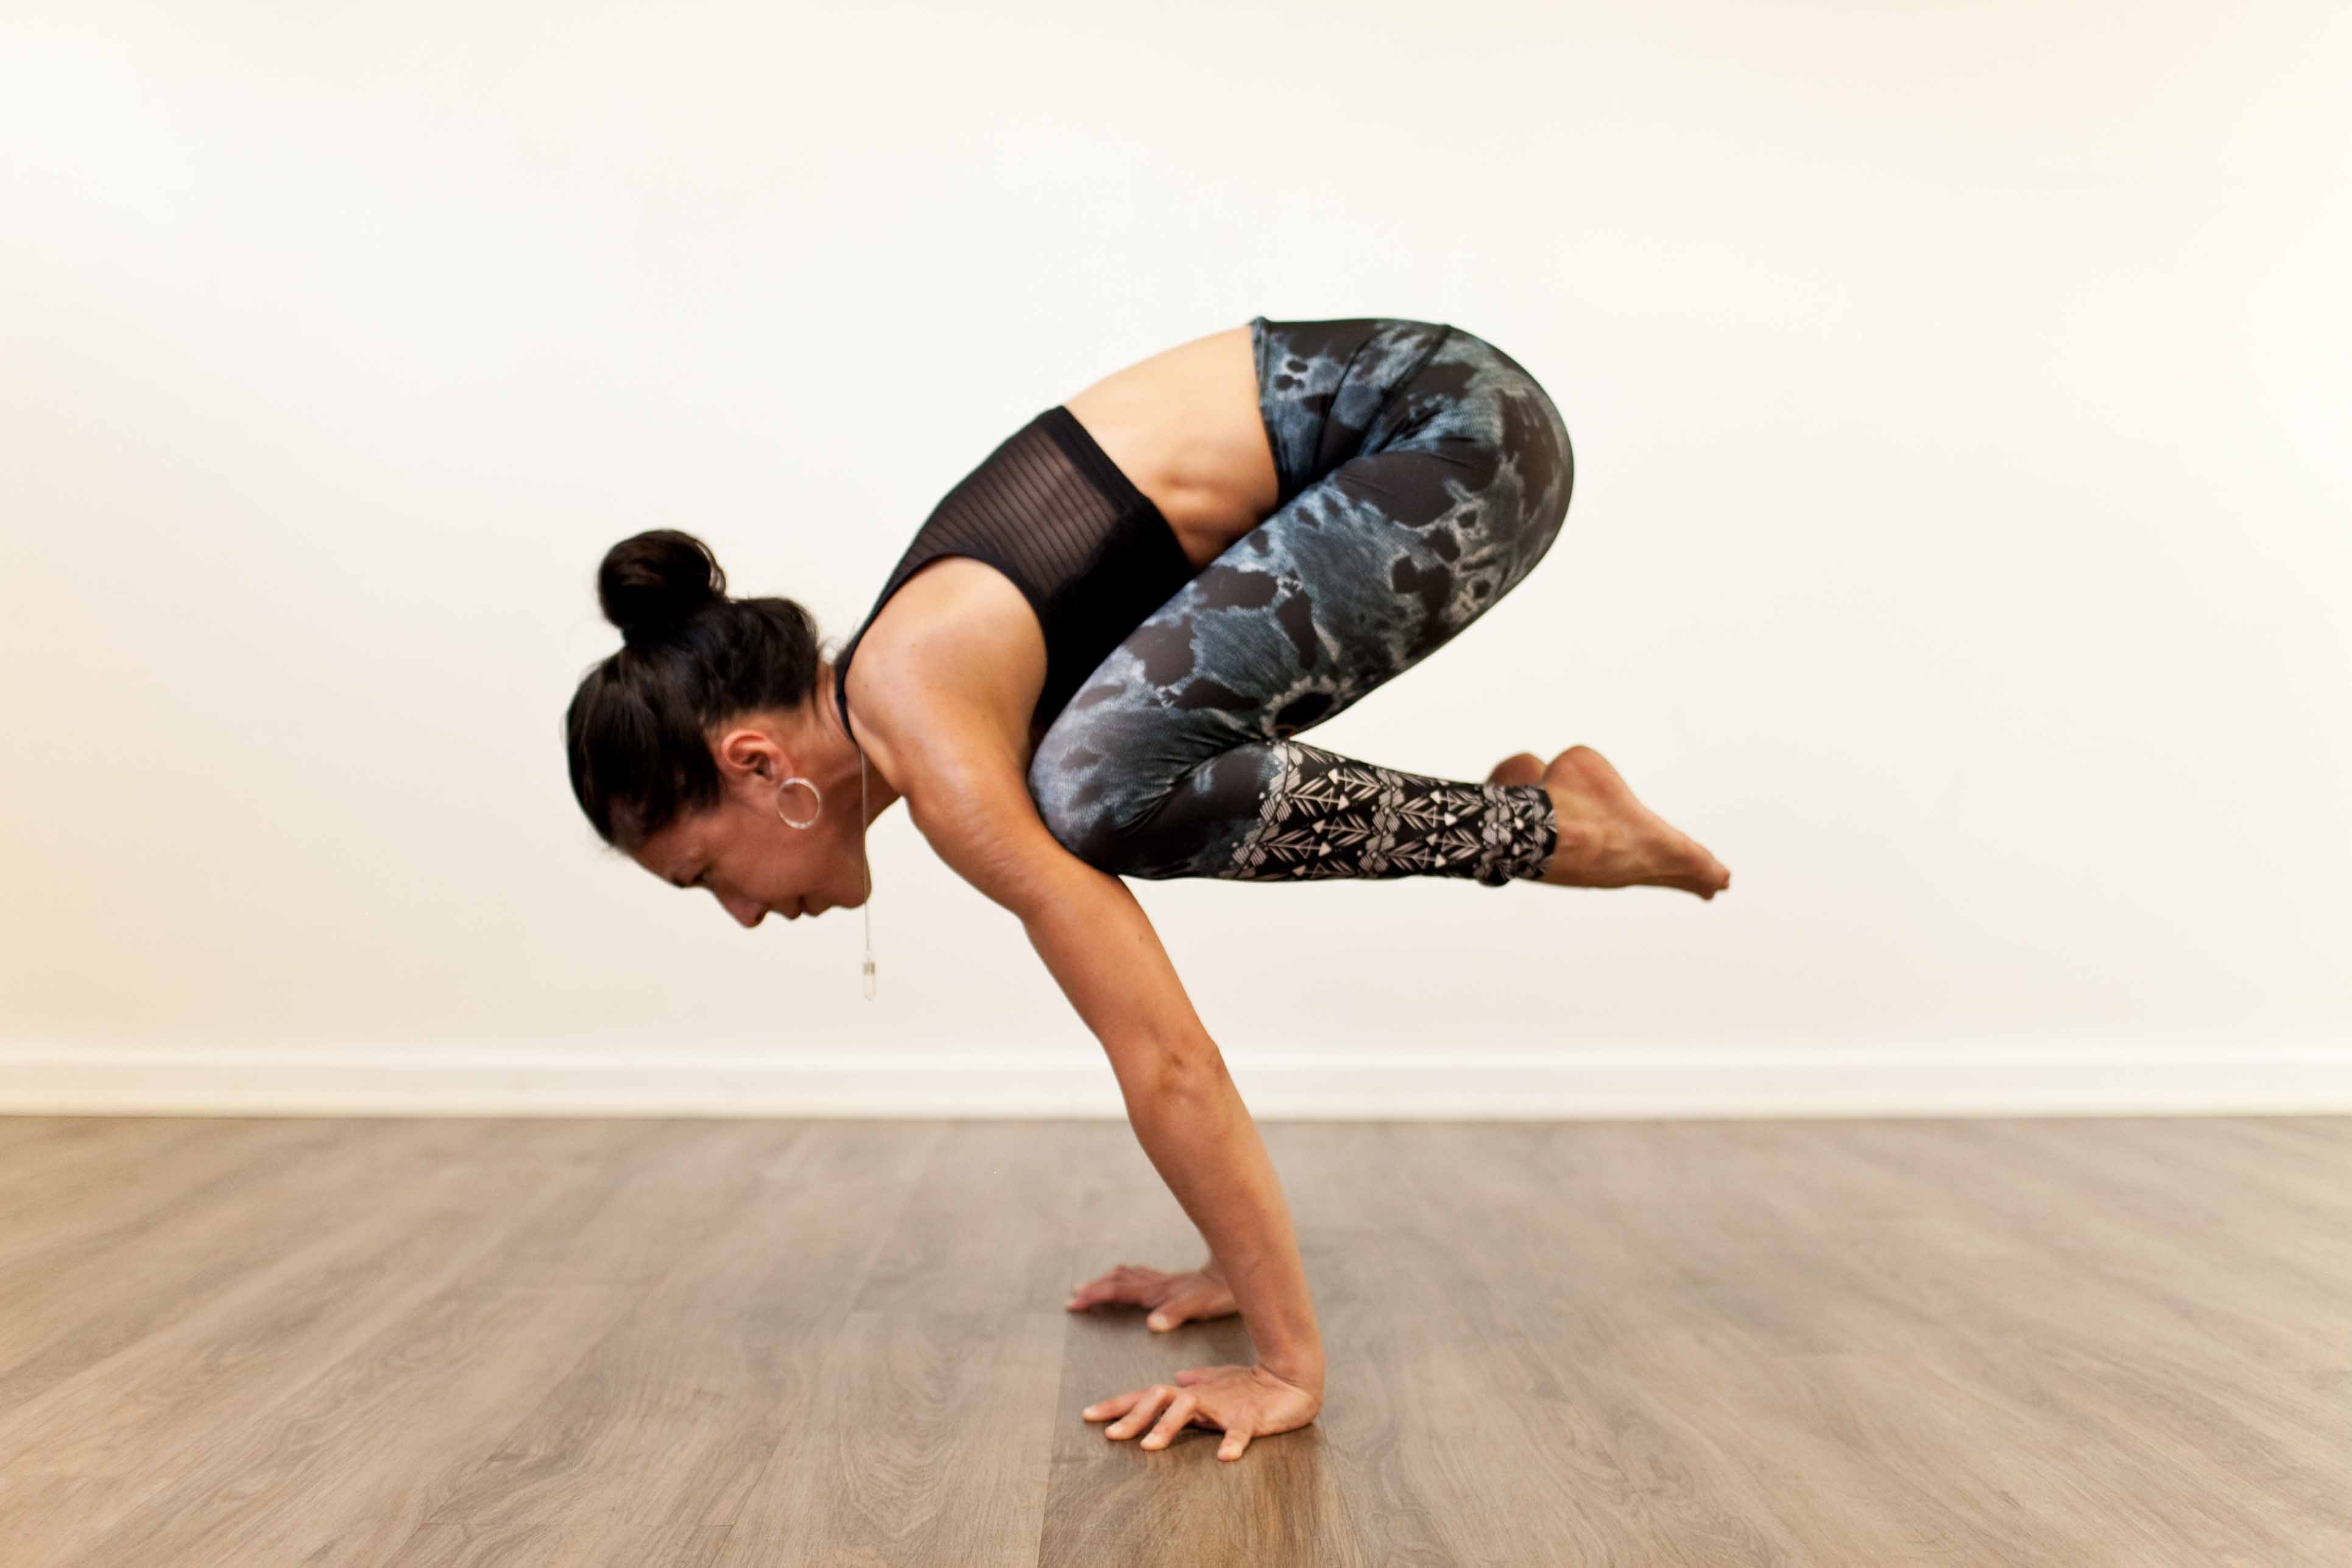
Bakasana (Crow Pose) is an arm balance in which you squat, plant your hands, rest your knees high on the backs of your upper arms and tip forward until your feet leave the floor. It is usually the first arm balance people learn, and it takes more technique than strength: the lift comes from leaning your weight forward over your hands and drawing your knees and belly in tight. Most people fly for the first time after a few weeks of regular practice.
Pose type: arm balance. Level: beginner to intermediate. Props: a block under your feet, and a cushion or folded blanket in front of your face.
What Bakasana means: crow or crane
The name comes from Sanskrit: baka means crane or heron, and asana means seat or posture. So Bakasana is, word for word, Crane Pose. The Sanskrit word for crow is kaka, which gives Kakasana.
In practice the names are mixed up. Most classes today call the bent-arm version Crow Pose and still call it Bakasana, and they use Crane for the harder version with straight arms. In B.K.S. Iyengar's Light on Yoga, Bakasana is the straight-arm pose. Some schools keep Kakasana for the bent-arm shape. None of these is wrong. They are different lineages naming the same family of shapes, and this guide follows the common usage: Crow with bent arms, Crane with straight arms.
How to do Bakasana, step by step
Warm up your wrists, shoulders and hips first. A few rounds of Sun Salutations and a minute in a squat are enough.
- Stand at the front of your mat with your feet a little apart. Bend your knees and come down into a squat, heels down if they reach. If they do not, stand on a block, which also gives you a head start on height.
- Widen your knees and place your hands on the mat in front of you, shoulder-width apart. Spread your fingers wide and press the pads of the fingers and the knuckles into the floor, so the weight does not sit in the heel of the hand.
- Bend your elbows straight back, toward your heels, not out to the sides. Your upper arms make a shelf.
- Come onto the balls of your feet and lift your hips. Place your knees as high as you can on the backs of your upper arms, close to the armpits. Squeeze your knees into your arms and your arms into your knees.
- Round your upper back a little and draw your belly in toward the spine. Crow is a compact shape: heels toward the buttocks, knees toward the chest.
- Look at the floor a hand's length in front of your fingertips. Then shift your weight forward until your shoulders move past your wrists and your feet feel light.
- Lift one foot off the floor, then the other. Bring the big toes together and the heels toward your seat. If only one foot will come up, stay there. That is the practice.
- Stay for three to five breaths. To come down, exhale and lower your feet back to the floor with control. Rest in Balasana (Child's Pose) and shake out your wrists.
The gaze decides a lot. Look down at your hands and the weight drifts back to your feet. Look forward and you tip. Put a cushion in front of your face the first few times, so falling costs nothing.
Benefits of Crow Pose
Crow is a strength and control pose. What it trains is easy to name:
- Arms and shoulders: the triceps and the front of the shoulders hold the bent elbows, and the serratus anterior pushes the floor away and rounds the upper back.
- Core: the abdominals and hip flexors pull the knees up and in and keep the body compact over the hands.
- Wrists and hands: the forearms and fingers work to keep you from tipping forward. Your fingertips are your brakes.
- Balance: you learn to find the point where your weight sits over your hands, a skill that carries into headstand and the harder arm balances.
There is a mental side too, and teachers talk about it often. Crow asks you to lean your face toward the floor, and learning to do that calmly is part of the pose. Claims that Crow tones the abdominal organs or improves digestion are common online. No study backs them.
Who should skip or modify Crow Pose
All the weight goes through the hands and wrists, with the wrist bent back to about 90 degrees. That is where most problems show up.
- Wrist pain or injury, including carpal tunnel syndrome: skip the full pose, or practise Baby Crow on the forearms (see the variations below), which takes the wrists out of it.
- Shoulder or elbow injury: wait until you can hold Plank for 30 seconds without pain.
- Pregnancy: the knees press into the belly and a fall lands on the front of the body. Most teachers advise leaving it out, especially after the first trimester.
- High blood pressure, glaucoma or recent eye surgery: the head is lower than the heart for a short time. Check with your doctor first.
- Knee trouble: the deep squat on the way in can be hard. Stand on a block so the knees bend less.
Sharp pain in the wrist means come down. Do not breathe through it. Our wrist mobility class is a good daily habit if your wrists are stiff.
Common mistakes
- Not leaning forward enough. The most common reason people stay on their feet. Your nose goes past your fingertips before the feet get light.
- Elbows flaring out. The shelf collapses and the knees slide down the arms. Keep the elbows pointing back.
- Knees too low. Resting on the elbows or forearms makes the lever long and heavy. Aim for high up on the upper arms.
- Weight in the heel of the hand. Press through the fingertips and the base of the index finger.
- Jumping up. Hopping both feet up at once throws the weight around. Lift one foot, then the other.
- Holding your breath. Breathe slowly through the nose. If you cannot, come down and try again.
Preparatory poses
Crow needs open hips for the squat and a strong core and shoulders for the lift. These poses build both:
- Malasana (Garland Pose): the same deep squat you start Crow from.
- Phalakasana (Plank Pose): teaches you to push the floor away and hold the belly in.
- Chaturanga Dandasana (Four-Limbed Staff Pose): the bent elbows pointing back are the same arm position as in Crow.
- Vasisthasana (Side Plank): balance on one hand and the side of the core.
- Adho Mukha Svanasana (Downward-Facing Dog): load the hands and open the shoulders.
- Marjaryasana (Cat Pose): the rounded upper back you hold in the air.
Our guide to the core in yoga explains which muscles do the work, and why yogis need strength training covers the pushing strength that arm balances depend on.
Follow-up poses
- Parsva Bakasana (Side Crow): the twisted version, with both knees on one arm.
- Bakasana with straight arms (Crane): the next step once Crow feels steady.
- Sirsasana (Headstand): the compact shape and the forward lean are good preparation for tucked headstand.
- Balasana (Child's Pose): rest for the wrists and shoulders after you come down.
Crow Pose variations
- Baby Crow: the same shape on the forearms, palms flat or together, knees against the outside of the upper arms. You train the lean and the core without loading the wrists, and without far to fall.
- Crow on a block: stand on a block for the start. The extra height makes it easier to place the knees high on the arms.
- One foot up: lift one foot and keep the toes of the other on the floor. Change sides.
- Crane (straight arms): press the arms straight while the knees stay high in the armpits. More core and more shoulder strength.
- Eka Pada Bakasana (One-Legged Crow): one leg extends straight back from the balance.
- Parsva Bakasana (Side Crow): both knees on the outside of one arm, with a twist through the spine.
Crow also turns up in many yoga strength classes and Vinyasa flows, so you get to try it often.
To practise with a teacher, the short Crow Pose tutorial gives you three ways into Bakasana with a block, and 45 Minutes to Crow builds the strength for it in a full Vinyasa class.
Frequently asked questions
Can a beginner do Crow Pose?
Yes. Crow is often the first arm balance people learn, and it depends more on technique than on strength. Start with Baby Crow on the forearms or with one foot lifted, put a cushion in front of your face, and practise a few tries at a time several days a week.
Why is Crow Pose so difficult?
Mostly because it asks you to lean your face toward the floor. The body holds back, the weight stays in the feet and nothing lifts. Low knees and elbows flaring out make it harder too. Once you trust the lean, the pose often comes quickly.
What is Crow Pose good for?
It builds strength in the arms, shoulders, wrists and core, and it trains balance over the hands. It is also the base for harder arm balances such as Side Crow and Crane, and for tucked headstand.
Is Bakasana Crow or Crane Pose?
Literally, Crane: baka means crane in Sanskrit, and kaka means crow. In most classes today the bent-arm pose is called Crow Pose or Bakasana, and the straight-arm version is called Crane. In Light on Yoga, Bakasana is the straight-arm pose.
How long does it take to learn Crow Pose?
It depends on your strength and how often you practise. Many people lift both feet within a few weeks of trying three or four days a week. Others need a few months. Practising the preparatory poses shortens the wait.
How long should you hold Crow Pose?
Start with one or two breaths and build up to five. Several short holds with rest in between teach more than one long, shaky hold. Come down before your wrists get tired.
What is the hardest pose in yoga?
There is no agreed answer. Poses often named include Handstand, Eka Pada Koundinyasana, Mayurasana (Peacock Pose) and deep backbends. For most beginners, Crow is the first pose that feels out of reach, and one of the first to come within reach with practice.
Practise it with a teacher
Over 600 online yoga classes and programs for $4.99 a month. Cancel any time.
Become a member