Lolasana (Pendant Pose): How to Do It Step by Step

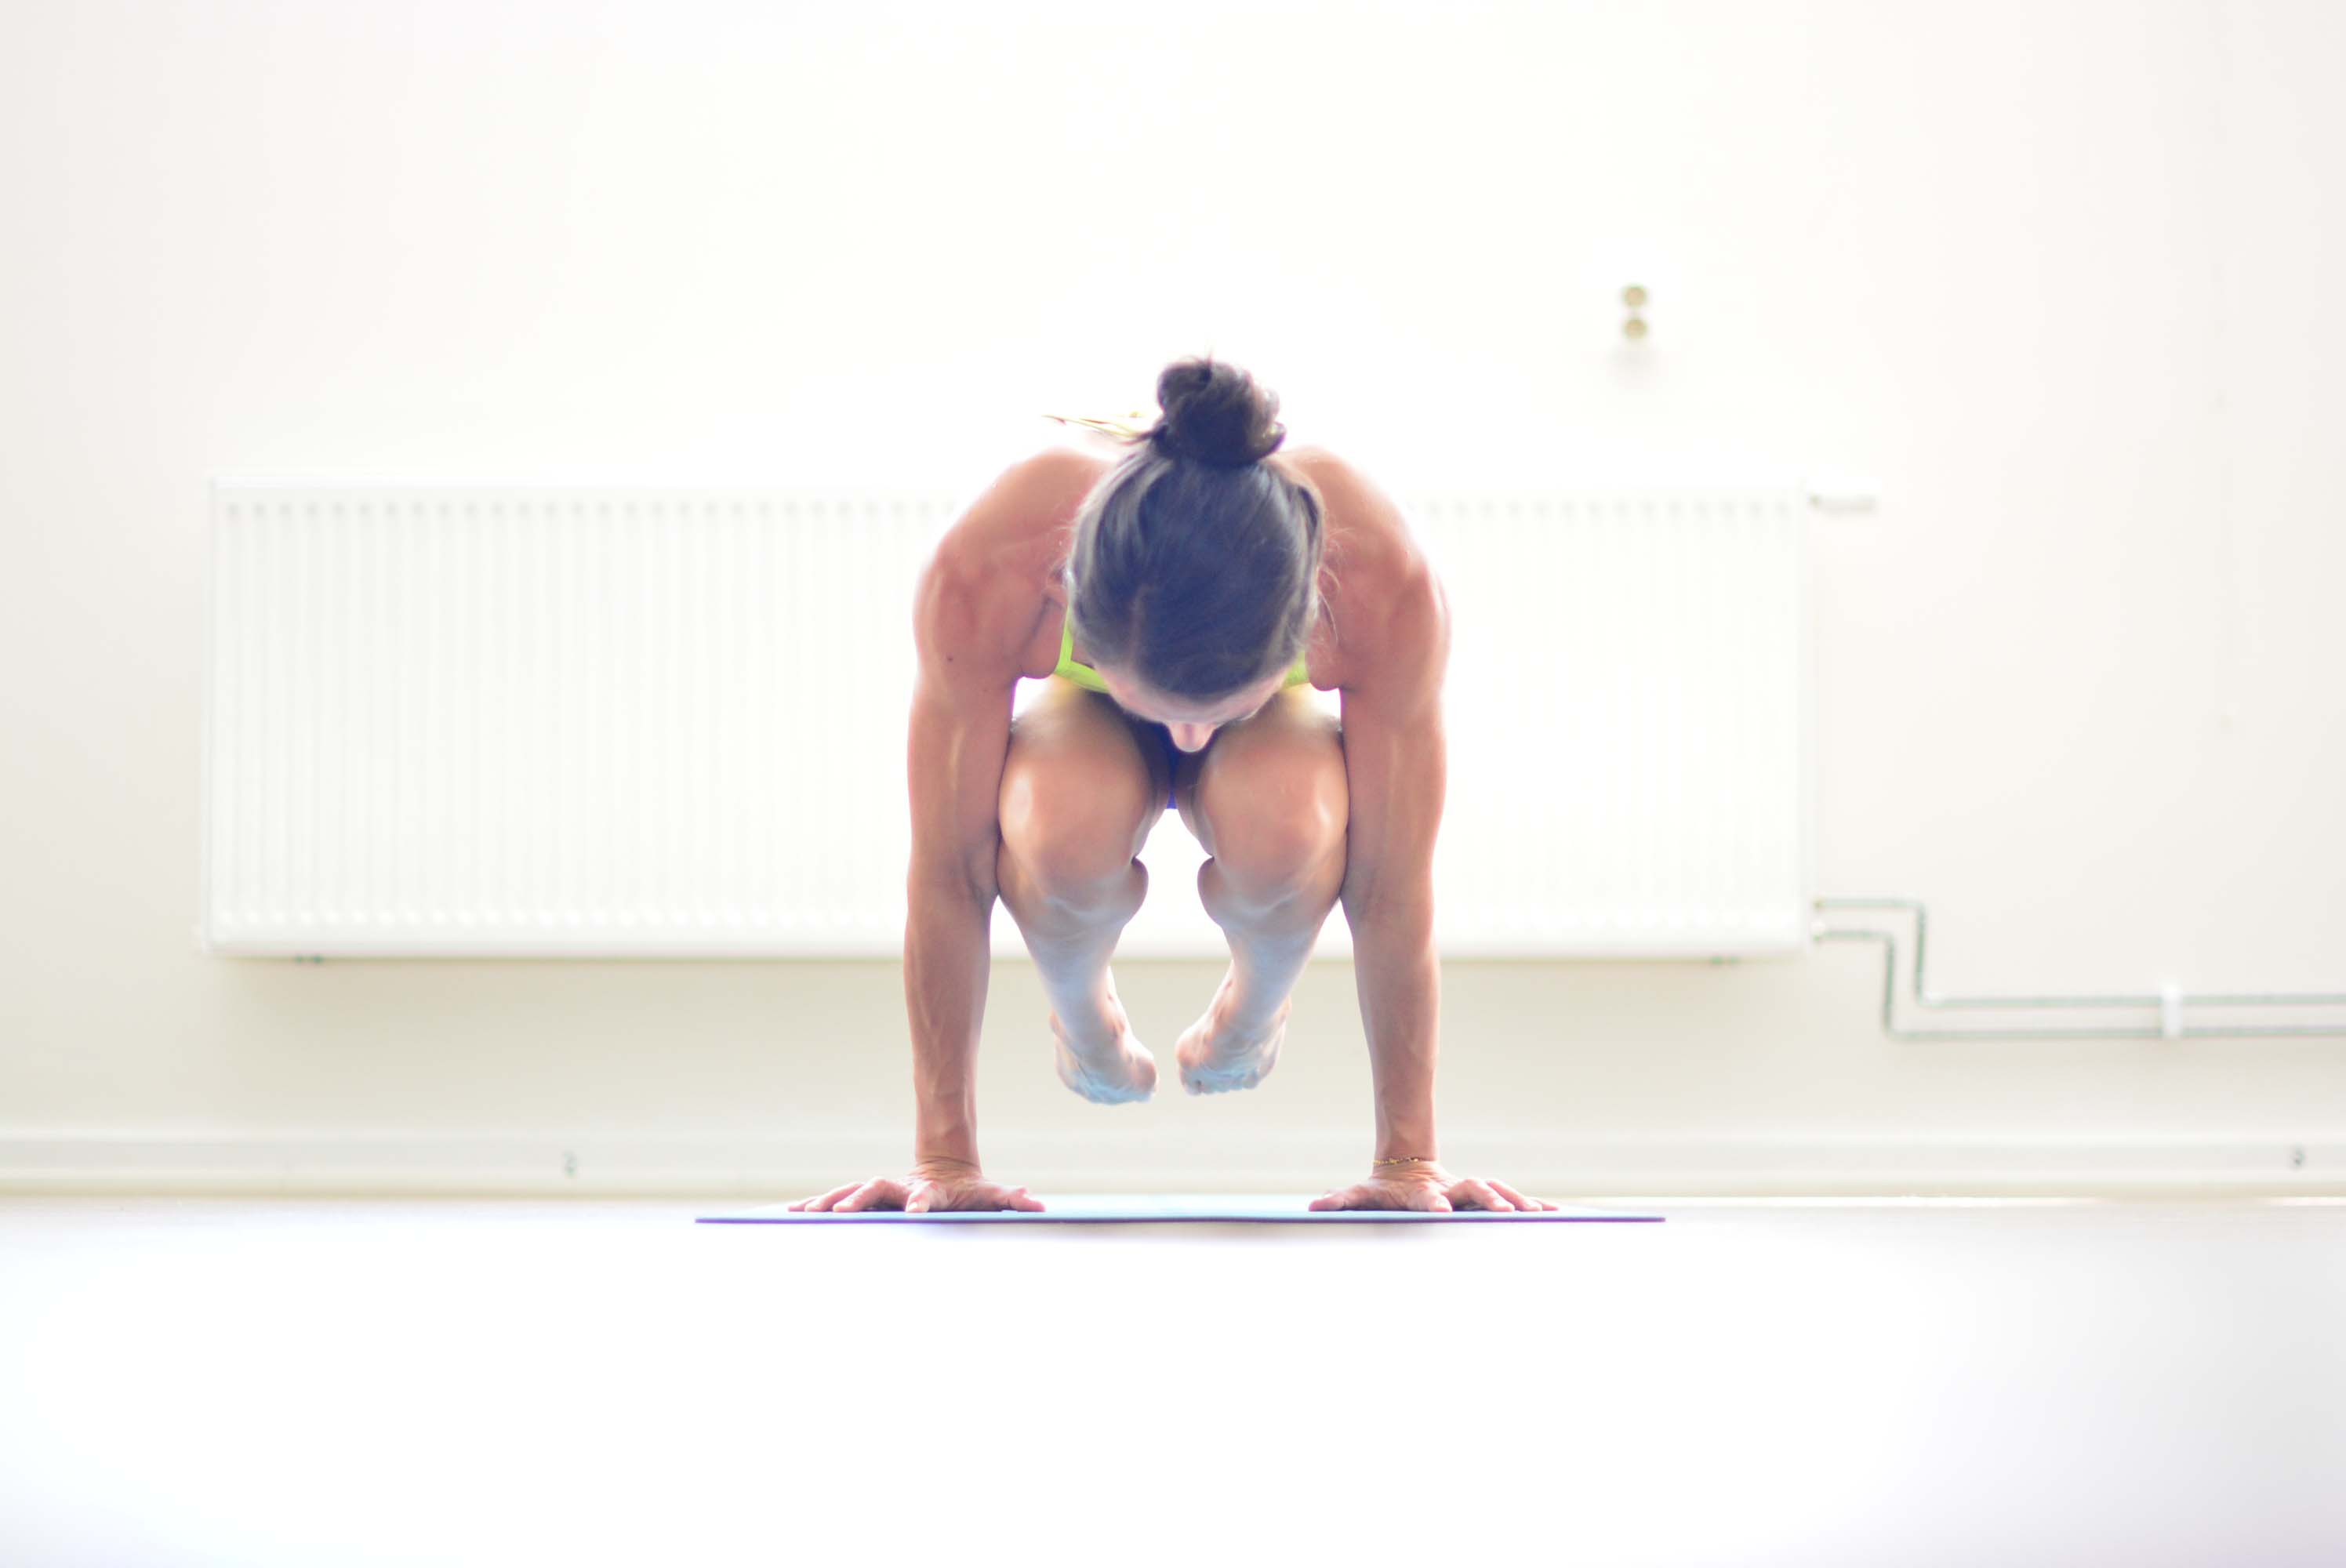
Lolasana (Pendant Pose) is an arm balance in which you kneel with the ankles crossed, press your hands into the floor and lift the whole body, knees tucked to the chest and feet off the ground. The body hangs between the arms like a pendant on a chain, and you can hold it still or swing it gently. It asks for strong wrists and shoulders and a deeply rounded, active core, so most people build up to it with blocks under the hands and the feet still on the floor.
Pose type: arm balance, core strength. Level: intermediate. Props: two yoga blocks.
What Lolasana means
The name joins two Sanskrit words: lola, dangling, swinging or trembling, and asana, seat or posture. It is the image of something that hangs and moves, like an earring or a pendant. You say it low-LAH-suh-nuh, with the stress on the second syllable.
Lolasana is not one of the old seated postures of the hatha texts. It shows up in 20th-century teaching from Mysore: B.K.S. Iyengar describes it in Light on Yoga, and in the Ashtanga tradition the same lift, with crossed ankles, is the shape you pass through when you jump back between seated postures. Some historians connect arm balances like this one to the Indian gymnastics practised in Mysore at the time. That link is argued, and the exact line from a gymnastics drill to this pose is not documented.
How to do Lolasana, step by step
Warm up your wrists and your core first. A few rounds of Plank Pose, some wrist circles and a few rounds of cat and cow are enough.
- Kneel in the middle of your mat and sit back on your heels. Place a block on its middle height on each side of your knees, a little in front of them.
- Cross your right ankle over your left, so the tops of the feet rest on the floor behind you.
- Put your palms on the blocks, fingers spread, the middle fingers pointing forward. Straighten your arms.
- Press the blocks away and push the floor away from your shoulders. Your shoulder blades spread wide and your upper back rounds.
- Breathe out, draw your navel back toward your spine and pull your knees in toward your chest. Tip your weight a little forward over your hands.
- Lift your seat first, then your shins and feet. Keep the ankles crossed and the heels drawn toward your buttocks.
- Hold for three to five breaths with a steady gaze on the floor a little in front of you. If you want the swing, move the knees slowly forward and back between your arms.
- To come out, lower the feet and knees with control, sit back on your heels and shake out your wrists. Cross the other ankle on top and repeat.
Most people have to lean further forward than feels natural. The lift comes from the shoulders pressing down and the belly drawing in, not from the arms bending.
If you cannot lift yet
Do steps 1 to 5 and lift only your knees, with the tops of the feet still on the floor. Hold there for five breaths. This builds the push and the core work you need, and one day the feet follow. Lizette Pompa's ten-minute class Working Towards Lolasana is built on this idea, with the feet on the floor the whole time.
Benefits of Pendant Pose
Lolasana is a strength pose. It works the muscles that hold your body up on your hands and keep it folded into a small ball.
- Arms and shoulders: the triceps keep the elbows straight, and the muscles around the shoulder blades, serratus anterior among them, press the body up and away from the floor.
- Core: the abdominals and the hip flexors work hard to keep the knees tucked and the pelvis lifted.
- Wrists: they carry your full weight in a bent position, which builds tolerance over time if you progress slowly.
Lolasana does not stretch or straighten the spine. The back rounds on purpose. The rounding is what makes room for the knees to pass between the arms.
In Ashtanga, the lift of Lolasana is the base of the jump back and the jump through in the Primary Series, so practising it makes those transitions lighter.
Who should skip or modify Lolasana
- Wrist problems: skip it or work on fists or fingertips on blocks if you have carpal tunnel syndrome, a wrist injury or pain when you bear weight on your hands. Our ten-minute Wrist Watch class strengthens the wrists for this kind of work.
- Shoulder injuries: skip the full lift until you can hold Chaturanga Dandasana and plank without pain.
- Knee problems: the kneeling start loads the knees. Put a folded blanket under them, or start from a seated position with the legs crossed.
- Pregnancy: the pose compresses the belly and asks for strong abdominal work. Leave it out.
- Recent abdominal surgery or a hernia: leave it out until your doctor has cleared core work.
For more on how to practise without getting hurt, read our 10 tips to avoid yoga injuries.
Common mistakes
- Collapsed shoulders. When the chest sinks between the arms, the weight drops into the shoulder joints. Push the floor away.
- A straight back. If you try to keep the spine long, the knees hit the floor. Round the upper back like a cat.
- Weight too far back. The feet stay glued to the floor when the shoulders sit behind the wrists. Lean forward until the hands take the weight.
- Bent elbows. Bending the arms lowers you. Keep them straight and let the shoulders do the lifting.
- Holding the breath. Short breaths are fine. No breath at all makes the pose shaky and short.
- No blocks. Unless your arms are long compared to your torso, the floor is too far away. Blocks give you the height you need.
Preparatory poses
- Plank Pose: the pressing action through the hands and shoulders.
- Paripurna Navasana (Boat Pose): the hip flexors and abdominals that keep the knees tucked.
- Adho Mukha Svanasana (Downward-Facing Dog): weight on the hands with the shoulders stable.
- Vajrasana (Thunderbolt Pose): the kneeling seat you lift from.
- Cat Pose from all fours: the rounding of the upper back and the spread of the shoulder blades.
Follow-up poses
- Bakasana (Crow Pose): the knees rest on the upper arms, so the same forward lean takes less strength. Many people learn it before Lolasana.
- Parsva Bakasana (Side Crow): the same core work with a twist.
- Balasana (Child's Pose): rest for the wrists and the back afterwards.
Lolasana variations
- Feet on the floor: knees lifted, tops of the feet down. The beginner version.
- One foot at a time: lift one foot, then the other, to find the balance point before you lift both.
- Swinging Lolasana: in the air, move the knees slowly forward and back. This is the pendant the name refers to.
- Tolasana (Scale Pose): the same lift with the legs in Padmasana (Lotus Pose). You need a comfortable Lotus first.
- Jump back from Lolasana: in Ashtanga yoga, the lift continues as the legs swing back through the arms into Chaturanga.
Start with ten minutes of Lizette Pompa's Working Towards Lolasana, feet on the floor, two or three times a week.
Frequently asked questions
What is the difference between Lolasana and Tolasana?
The legs. In Lolasana the ankles are crossed and the knees tucked to the chest, with the body hanging between the arms. In Tolasana, Scale Pose, the legs are in Lotus and you lift the folded legs from the floor. Tolasana needs open hips, Lolasana mostly strength.
Is Lolasana difficult?
Yes, for most people it is one of the harder arm balances to lift into, because the knees have no support on the arms, as they do in Crow Pose. The core and shoulders do all the work. Blocks under the hands make it easier, and many people practise it for months before the feet leave the floor.
Is Lolasana safe for beginners?
The feet-on-the-floor version is fine for most beginners with healthy wrists and shoulders. The full lift is better left until you can hold plank for 30 seconds and lift into Boat Pose with control. Skip it if your wrists hurt when you bear weight.
How do you get into Lolasana?
Kneel with your ankles crossed and your hands on blocks beside your knees. Push the blocks away, round your upper back, draw the belly in and pull the knees toward the chest. Lean forward over your hands and lift the seat, then the feet. Keep the arms straight.
Why can't I lift my feet in Lolasana?
Usually because your arms are short compared to your torso, your weight sits too far back, or your back is too straight. Put blocks under your hands, lean forward over the wrists and round the upper back. Core strength from Boat Pose and plank does the rest.
How long should you hold Lolasana?
Three to five breaths is a good target. In Ashtanga the lift often lasts only a breath or two on the way through a jump back. Build up time slowly and come down as soon as the shoulders start to sink.